How To Make Forms Attractive In Microsoft Accesss 2007
Presentation
Access 2007 Now that you know how to improve shapes function, it's a great opportunity to consider what a frame resembles. In this exercise, we'll deliver the different approaches to alter a frame design, including how to include a logo and apply an Auto Format to the shape. We'll additionally cover utilizing and designing titles, and additionally moving and applying outskirts to objects in Access.

Making forms more attractive
Since others will utilize the structures in your database to enter information, you might need to make the structures all the more outwardly engaging. These sorts of changes are done to the shape in Layout see.
In Layout see, you see the shape as it will appear to the client in Form see, so it's valuable for setting the extent of controls and different questions on the frame, and also to change the text style, hues, and fringes on the frame.
To change to Layout see:
There are three different ways you can open the frame in Layout see.
- Right-tap the Form tab or the shape name in the question list, at that point select Layout View from the rundown.
- Select Layout aView in the Views gather on the Ribbon.
- Tap the Layout see symbol in the base right corner of the Access 2007 window.
Including a logo
- Access 2007 consequently puts a shape symbol, similar to the one beneath, in the header territory of each frame you make.
- One approach to alter the look of your structures is to evacuate the symbol and supplant it with a logo. This is anything but difficult to do utilizing the Logo charge.
To supplant the symbol with a logo:
- Erase the frame symbol.
- Select the Logo order from the Controls aggregate on the Ribbon.

- Utilize the Insert Picture exchange box to find the photo document you need to use as the logo, at that point click OK. The new logo ought to show up.
- You can move and resize the logo also. Moving and resizing objects on a shape is canvassed later in this exercise.
Applying a style with AutoFormat
Another straightforward method to significantly change the way your shape looks is to apply a style with the AutoFormat order. You could change the shading for each piece of the shape without anyone else, yet Access has effectively joined hues in a few alluring styles. These styles are accessible under the AutoFormat order.
To apply an AutoFormat:
- Tap the AutoFormat summon on the Ribbon.
- Select the coveted configuration. The change will show up when the mouse catch is discharged.
Working with titles
One of the most effortless things to change on the frame is the title, which shows up in the shape header with the symbol or logo.
To change the shape title:
- Tap the Title order in the Controls amass on the Ribbon.
- At the point when the title feature shows up, type the new title, at that point hit the Enter key on your console.
- Note: The title does not influence the name of the shape, and the other way around.
Changing text on the form
Access, similar to all Microsoft Office 2007 items, enables you to change the textual style, content size, content shading, and arrangement. It likewise gives you a chance to apply strong, italics, or underline to the content. The majority of this is done from the Ribbon, as found in the graph underneath.
To change content:
- Feature the content.
- Apply the coveted configuration by completing at least one of the accompanying:
- Select the coveted textual style from the text style confront drop-down rundown.
- Set the extent of the content utilizing the text dimension choice rundown.
- Pick a shading for the content utilizing the text style shading selector.
- Apply either the intense, italics, or underline style.
- Extra content designing alternatives are accessible in the Font gathering. The above rundown incorporates the most widely recognized content adjustments.
Working with objects on a shape
Other ways to modify the way a form looks in Access 2007 include resizing and repositioning the objects that appear on the form, and applying borders to objects on the form. All of these tasks are easily done in Layout view.
To apply a border to objects on a form:
- Highlight the object by clicking it.
- Select a width using the Line Width command.
- Choose a style using the Line Style command.
- Select a color using the Line Color command.
Blogs : Office com setup
Microsoft is bringing Office 365 to the Mac App Store later this year
www.office.com/setup - Apple kicked off its WWDC developer conference in San Francisco today, and during the macOS segment, the company announced that its upcoming redesigned Mac App Store will soon welcome Microsoft’s Office 365 apps.
www.office.com/setup - Microsoft already put some its free apps such as OneNote and OneDrive on the Mac App Store years ago, but it looks like Microsoft realized that it was more convenient for users to bring all of its Office apps over there as well, just like Office 2016 is now available on the Microsoft Store.

 Richard Hay@WinObs
Microsoft bringing Office 365 to the Mac App Store later this year. #Whoa #NewMicrosoft
The move is quite interesting as Microsoft recently released a standalone version of its OneDrive Mac client, which unlike the Mac App Store version uses its own update mechanism. As of today, Office 2016 for Mac also has its own AutoUpdate tool, with an option for automatic download and installing new updates, as well as joining the Office Insider program to test preview releases.
Apple’s iWork productivity suite is currently right on top of the Mac App Store’s Productivity category, and it will be interesting to see if the Office 365 apps will become a popular item in that same section. Apple said today that the redesigned Mac App Store in macOS 10.14 will introduce newly curated collections, videos on store listings and more, and it will ship later this Fall.
SharePoint introduces new Microsoft Planner integration
www.office.com/setup - Microsoft Planner, the company’s task management app for Office 365 is getting a new integration with SharePoint sites today.
www.office.com/setup Blogs: Just like Microsoft Teams users can add a Planner tab to have all their tasks all in one place, Microsoft is now allowing SharePoint users to embed Planner plans into SharePoint sites.

Do more with #MicrosoftPlanner in #SharePoint such as adding a web part to quickly glean and access relevant information. https://techcommunity.microsoft.com/t5/Planner-Blog/New-Planner-capabilities-bring-task-management-directly-into/ba-p/192868 …
In a blog post, Microsoft detailed two different Planner capabilities in SharePoint: the first one is the ability to add a Planner plan to the left navigation pane of any SharePoint site for easy access. To go even further, the new Planner web part makes it possible to add plan information like the Planner Board or Charts view of a Planner plan right on the homepage of your SharePoint Site. You can see how it looks in the image below:
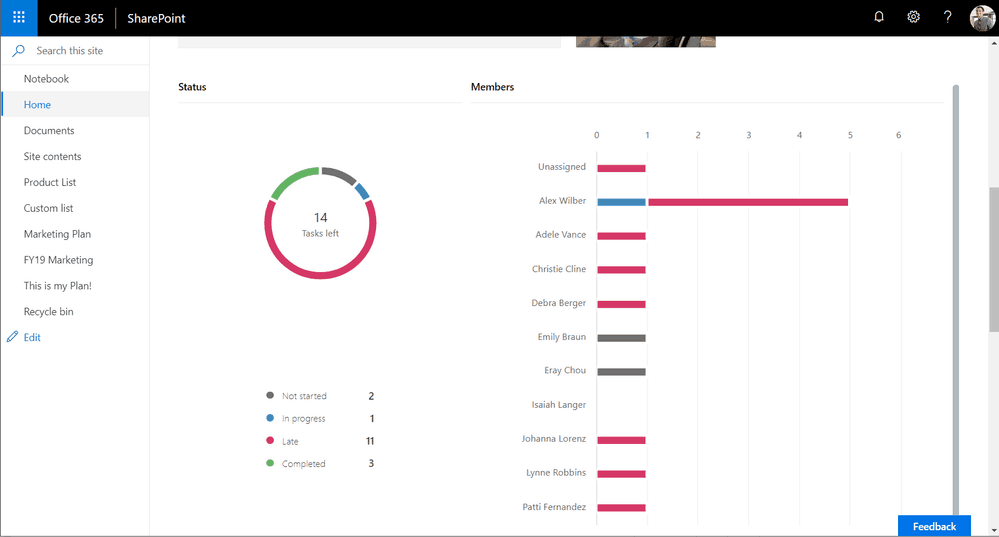
These two new Planner capabilities are available today for all SharePoint users. Microsoft recently integrated its Planner app with the Outlook calendar, and we’re looking forward to seeing where Microsoft will bring it next.
Original Post: https://www.onmsft.com/news/sharepoint-introduces-new-microsoft-planner-integration
How To Merge Copies Of a Shared Workbook In Microsoft Excel
Merging copies of a shared workbook
Turning on the Track Changes include consequently Workbooks shares your exercise manual. At the point when various clients team up on the same shared exercise manual, you can utilize the Compare and Merge Workbooks order to see the majority of their progressions without a moment's delay and address them by tolerating or dismissing them.
Every individual you team up with must spare a duplicate of the mutual exercise manual utilizing a one of a kind record name that varies from the first. For instance, if the first document name is Agenda, your colleagues could utilize the records names Agenda—Ana's Changes or David Agenda Feedback.
You can just consolidation duplicates of the same shared exercise manual. The greater part of the duplicates you intend to union ought to be situated in a similar organizer.
To include the Compare and Merge Workbooks charge:
The Compare and Merge Workbooks charge isn't accessible on the Review tab yet can be added to the Quick Access toolbar. Begin here in the event that you have not as of now included the charge.
- Tap the File tab.
- Pick Options.
- The Excel Options discourse box will show up. Select Quick Access toolbar.

- Under Choose charges from, tap the drop-down menu and select All Commands.
- Find and select the Compare and Merge Workbooks charge.
- Snap Add to add it to the Quick Access toolbar.
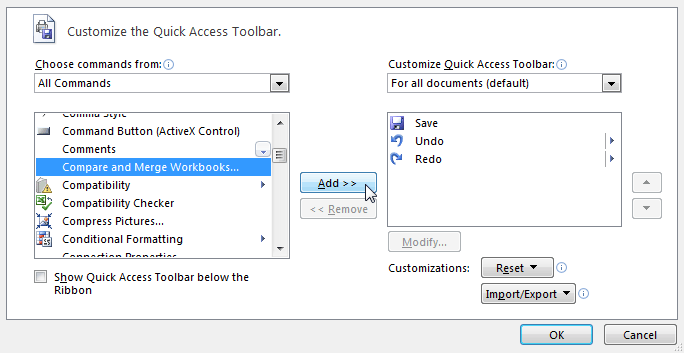
- Snap OK.
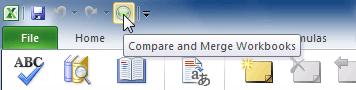
To compare and merge workbooks:
- To look at and blend exercise manuals:
- Open a duplicate of the common exercise manual.
Tap the Compare and Merge Workbooks order on the Quick Access toolbar.
- In the event that provoked, enable Excel to spare your exercise manual.
- The Select Files to Merge into Current Workbook exchange box will show up.
- Select another duplicate of the same shared exercise manual you need to combine. To choose various duplicates, hold CTRL or SHIFT on your console while tapping the record names.

- Snap OK.
- The progressions from each duplicate of the mutual exercise manual will be converged into a solitary duplicate. All progressions and remarks would now be able to be tended to in the meantime.

- Each shading speaks to changes from an alternate client, so you can tell initially who made the change.
Blogs : Office.com/setup
How To Inspect and Protect Documents In Microsoft Word 2016
Introduction
Before sharing a report, you'll need to ensure Ms Word does exclude any data you need to keep private. You may likewise need to dishearten others from altering your record. Luckily, Ms Word incorporates a few apparatuses to help examine and secure your archive.
Document Inspector
At whatever point you make or alter a record, certain individual data might be added to the record naturally—for instance, data about the report's creator. You can utilize Document Inspector to expel this kind of data before offering a record to others.
Since a few changes might be perpetual, it's a smart thought to utilize Save As to make a reinforcement duplicate of your archive before utilizing Document Inspector.
To utilize Document Inspector:
- Tap the File tab to go to Backstage view.
- From the Info sheet, click Check for Issues, at that point select Inspect Document starting from the drop menu.
tapping the Inspect Document order from the Backstage view
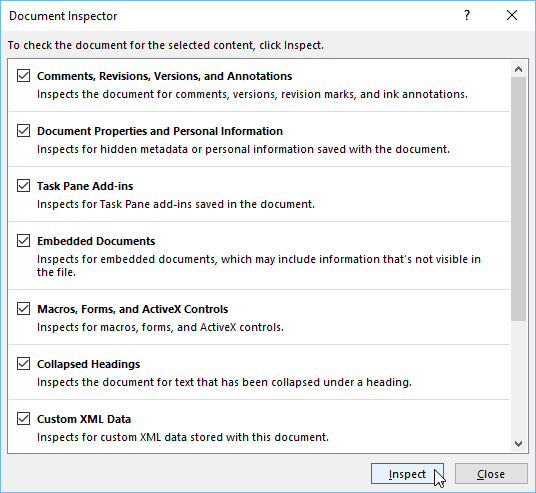
Record Inspector will show up. Check or uncheck the crates, contingent upon the substance you need to survey, at that point click Inspect. In our illustration, we'll leave everything chose.

- The assessment results will demonstrate a shout stamp for any classes where it discovered conceivably touchy information, and it will likewise have a Remove All catch for every one of these classifications. Snap Remove All to expel the information.
-
When you're set, click Close.

- Naturally, anybody with access to your report will have the capacity to open, duplicate, and alter its substance unless you ensure it. There are a few different ways to secure a record, contingent upon your requirements.
To ensure your archive:
- Tap the File tab to go to Backstage view.
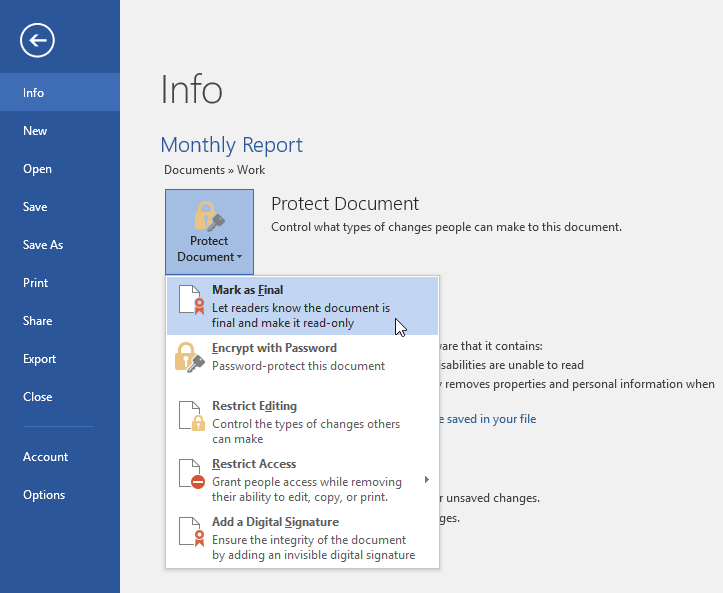
- From the Info sheet, tap the Protect Document charge.
- In the drop-down menu, pick the alternative that best suits your necessities. In our illustration, we'll select Mark as Final. Denoting your report as last is a decent method to debilitate others from altering the document, while different alternatives give you more control in the event that you require it.
- A discourse box will show up inciting you to spare. Snap OK.
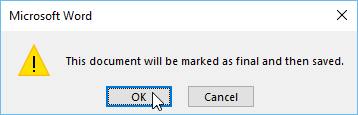
- Another discourse box will show up. Snap OK.

- The report will be set apart as last. At whatever point others open the record, a bar will show up at the best to demoralize them from altering the report.

Denoting a record as definite won't really keep others from altering it since they can simply choose Edit Anyway. In the event that you need to keep individuals from altering the archive, you can utilize the Restrict Access alternative.
Blogs : Office setup
How To Deal With Charts In Microsoft Excel 2013
Introduction
It can regularly be hard to translate Excel exercise manuals that contain a ton of information. Diagrams enable you to delineate your exercise manual information graphically, which makes it simple to envision examinations and patterns.Excel provides different types of charts used for different purposes.
Understanding outlines
Exceed expectations has a few distinct sorts of graphs, enabling you to pick the one that best fits your information. Keeping in mind the end goal to utilize outlines viably, you'll have to see how extraordinary graphs are utilized.
- Tap the bolts in the slideshow underneath to take in more about the kinds of outlines in Excel.

Exceed expectations has an assortment of outline composes, each with its own favorable circumstances.
- Tap the bolts to see a portion of the distinctive kinds of diagrams accessible in Excel.

Notwithstanding outline writes, you'll have to see how to peruse a graph. Graphs contain a few distinct components, or parts, that can enable you to decipher the information.
- Tap the catches in the intelligent beneath to find out about the distinctive parts of a diagram.
To embed a graph:
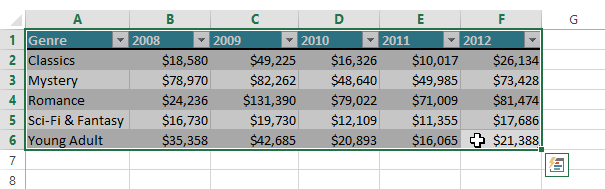
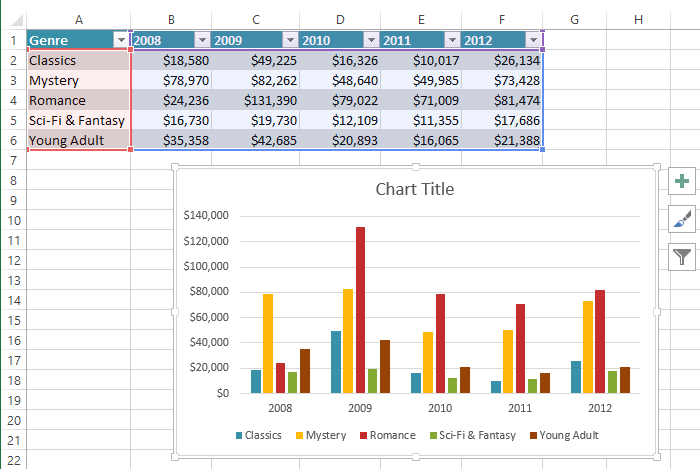
- Select the cells you need to graph, including the segment titles and line marks. These cells will be the source information for the outline. In our case, we'll select cells A1:F6.
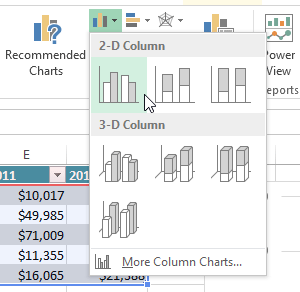
- From the Insert tab, tap the coveted Chart charge. In our illustration, we'll select Column.
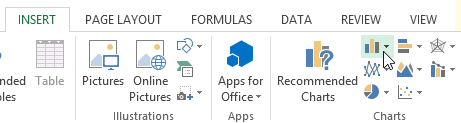
- Pick the coveted diagram compose starting from the drop menu.
- The chose graph will be embedded in the worksheet.
- In case you don't know which kind of outline to utilize, the Recommended Charts summon will propose a few unique graphs in light of the source information.

Graph format and style
In the wake of embeddings a graph, there are a few things you might need to change about the way your information is shown. It's anything but difficult to alter an outline's format and style from the Design tab.
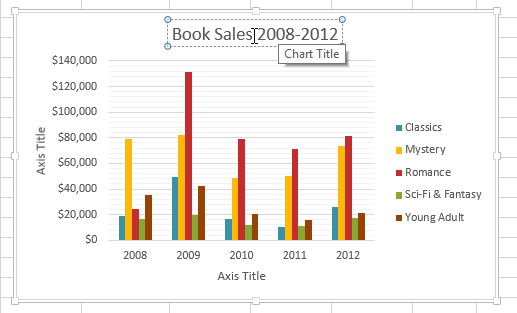
- Exceed expectations enables you to include diagram components, for example, outline titles, legends, and information marks—to make your graph less demanding to peruse. To include a graph component, tap the Add Chart Element charge on the Design tab, at that point pick the coveted component starting from the drop menu.

- To alter a graph component, similar to a diagram title, essentially double tap the placeholder and start writing.
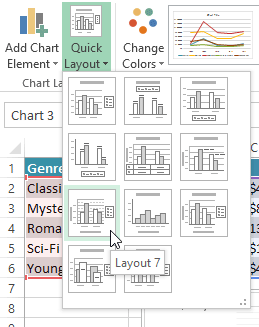
- In the event that you would prefer not to include diagram components exclusively, you can utilize one of Excel's predefined formats. Essentially tap the Quick Layout order, at that point pick the coveted format starting from the drop menu.
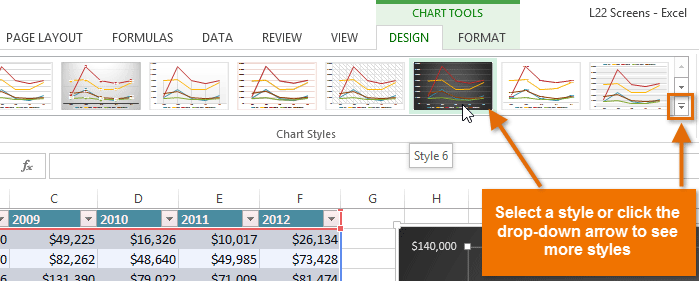
- Exceed expectations additionally incorporates a few distinctive diagram styles, which enable you to rapidly adjust the look and feel of your graph. To change the outline style, select the coveted style from the Chart styles gathering.
You can likewise utilize the outline designing alternate way catches to rapidly include graph components, change the diagram style, and channel the outline information.

Blogs : Install Office Key
How To Use Publication Designs and Gallery Designs In Microsoft Publisher 2003
Distribution Designs and the Design Gallery
Production Design enable you to add sets of realistic components to your distribution. The Design Gallery enables you to choose singular components to include, including lines, hues, and shapes. The two alternatives can help attract thoughtfulness regarding your distribution.
Publication Designs and the Design Gallery
- Apply a distribution configuration to your production
- Access the Design Gallery alternatives
- Embed a protest from the Design Gallery
- Change a current Design Gallery protest
To utilize Publication Designs:
- Snap Publication Designs in the errand sheet.
- Look through the included plans, and snap them to see the impact in your production.

To utilize the Design Gallery:
- Tap the Design Gallery symbol on the Objects toolbar. The Design Gallery exchange box shows up.
- Select a Category on the left to see cases on the right.
- Select a protest, and snap Insert to put it in your archive.
- Move, pivot, and resize the question fit your outline.
Blogs : Office setup help