How To Insert and Delete Rows and Columns In Microsoft Excel
Embeddings a column
You can embed a column in a spreadsheet anyplace you require it. Exceed expectations moves the current lines down to prepare for the better and brighter one embed.
To embed a column:
- Snap anyplace in the line underneath where you need to embed the new column.
- Pick Insert Rows from the menu bar.
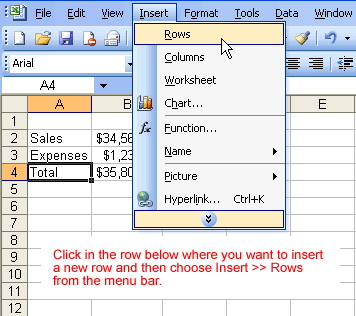
- Another line is embedded over the cell(s) you initially chose.
Or on the other hand
- Snap anyplace in the column beneath where you need to embed the new line.
- Right-click and pick Insert from the easy route menu.
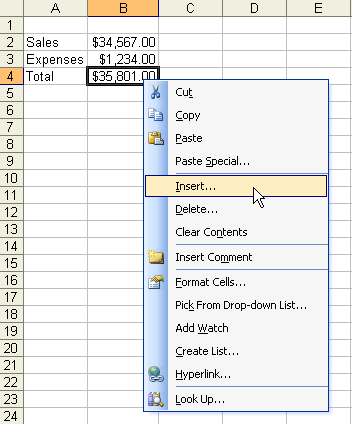
- The Insert discourse box opens.
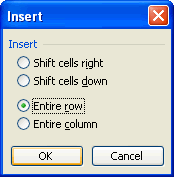
- Pick the Entire Row catch.
- Tap the OK catch.
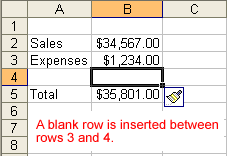
- Another column is embedded over the cell(s) you initially chose.
- Select different columns previously picking Insert to include pushes rapidly. Exceed expectations embeds a similar number of new columns that you initially chose.
Inserting a column
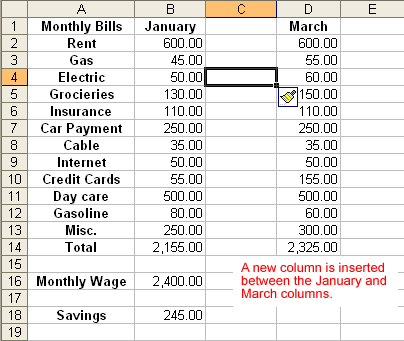
In Excel, you can embed a section anyplace you require it. Exceed expectations moves the current sections to prepare for the better and brighter one.
To embed a segment:
- Snap anyplace in the segment where you need to embed another section.
- Pick Insert Columns from the menu bar.
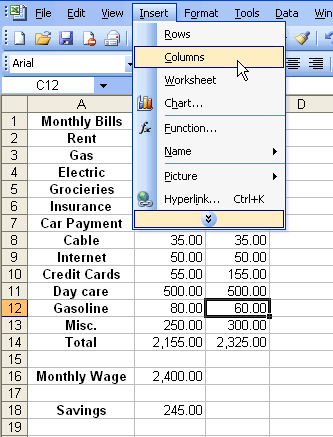
- Another segment is embedded to one side of the current section.
Or on the other hand
- Right-click and pick Insert from the easy route menu.
- Embed Selection on Shortcut Menu
- The Insert discourse box opens.

- Tap the Entire Column catch in the Insert exchange box.
- Tap the OK catch.
- Another section is embedded to one side of the current segment.
- Exceed expectations embeds a similar number of new sections that you initially chose.
Erasing segments and columns
Sections and lines are erased in much an indistinguishable way from embeddings segments and lines.
To erase a column and all data in it:
- Select a cell in the column to be erased.
- Pick Edit Delete from the menu bar.
- Tap the Entire Row catch in the Delete discourse box.
- Tap the OK catch.
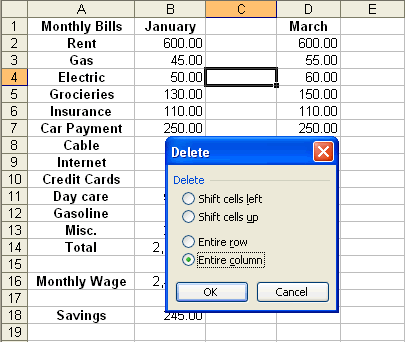
To erase a segment and all data in it:
- Select a cell in the segment to be erased.
- Pick Edit Delete from the menu bar.
- Tap the Entire Column catch in the Delete discourse box.
- Tap the OK catch.
Blogs : www.office.com/setup
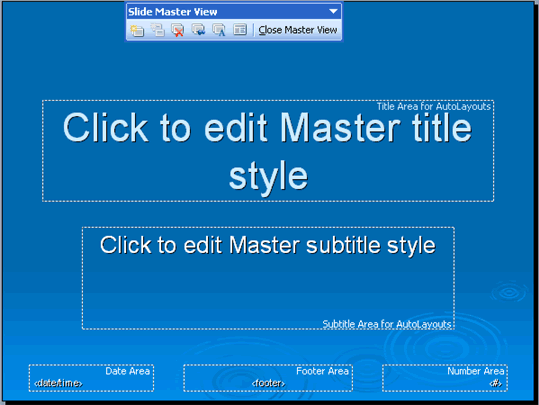
How To Create a Slide Master In Microsoft PowerPoint 2003
The Slide Master
In the event that you work for an organization, you might be requested to get ready long introductions. Or then again you might need to get ready slides about an exceptional occasion or event. A Slide Master enables you to make an introduction with various sorts of slides yet empower them to all have a similar look.
The components that you add to the Slide Master, for example, an organization logo, foundation, and text style shading—will be connected to the majority of your slides.
Creating a Slide Master
In the event that you have a Slide Master, you don't need to organize each and every slide in an introduction with a similar essential outline and content.
To make a Slide Master:
- Begin another introduction or open a current one.
- Snap View Master Slide Master.
- A slide with placeholders shows up.

- Snap Format Background.
- A discourse box shows up.
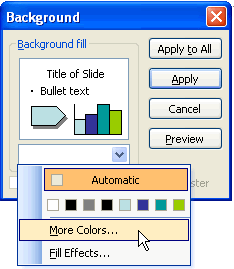
- Pick a foundation shading. For more hues, click More Colors.
- Select the content in the Master title style placeholder.
- Tap the down-directing bolt next toward the text style in the Formatting toolbar.
Or on the other hand
- Pick Format Font and pick a textual style, text style shading, and textual style.
- Close Slide Master View to spare changes.
- Picking textual styles for levels of the Slide Master
Choosing fonts for levels of the Slide Master
As you keep dealing with your Slide Master, see that the ace content styles placeholder contains a model of up to five projectiles in which the content gets littler for each level.
In the Slide Master, the text dimensions are preselected. The sizes depend on what a typical individual can read from a sensible separation. You can change the text dimension, however this is adjusting that you should need to do later.
By and large, you should keep the content a similar shading for the title and all content levels.
To alter the content styles for each level:
- Begin another introduction or open a current one.
- Snap View Master Slide Master.
- Select the content, at that point pick a textual style and textual style shading in the Formatting toolbar.

Viewing the Slide Master elements
- Subsequent to making or rolling out improvements to your Slide Master, you can see the majority of the essential outline components in your introduction.
- To see the Slide Master components connected:
- Snap View Normal.
Or on the other hand
- Tap the Normal view catch.
- A slide or slide shows up with the plan components of the Slide Master.
The Title Master
When you make your Slide Master, you can likewise make a Title Master. This is the second slide that shows up in the left sheet when you are taking a shot at the Slide Master of an introduction utilizing a plan layout.
This is an uncommon slide for the title slide of your introduction. Keep in mind, the Slide Master is a fundamental outline for every one of the slides of your introduction, while the Title Master just tends to the components of your title slide.
To alter the Title Master:
- Select the content in the Master title style placeholder.
- Pick Format Background, and pick a foundation shading.
- Tap the down-guiding bolt next toward the textual style in the Formatting toolbar.
Or on the other hand
- Pick FormatFont and pick a textual style, textual style shading, and textual style.\
Blogs : Office setup
New to Microsoft 365 in April—tools for the modern workplace
This month, we’re kicking off a new approach and moving from our monthly “What’s new in Office 365” blog to “What’s new in Microsoft 365.” We’re also consolidating updates from across Office 365, Windows 10, and Enterprise Mobility + Security on the new Microsoft 365 site.
Here’s a look at what we brought to Microsoft 365 in April.New capabilities to unlock employee creativity
Ink analysis in Microsoft PowerPoint— Easily convert hand-drawn words and shapes into text and objects in PowerPoint.
New ink gestures in Microsoft Word—
Easily convert hand-drawn words and shapes into text and objects in PowerPoint.
New ink gestures in Microsoft Word—New capabilities for the universal toolkit for teamwork
New features in Outlook for iOS— Calendar enhancements in Outlook for Windows—
Intelligent security for the modern workplace
Advanced security features in Microsoft 365 Business— Enhancing enterprise security—
Making IT simpler with a modern workplace
Capabilities to simplify IT management— Microsoft 365 Security & Compliance Center.
Centralized Deployment of Outlook add-ins—
Microsoft 365 Security & Compliance Center.
Centralized Deployment of Outlook add-ins—Other updates
- Today, we announced updates to our Microsoft 365 roadmap that include new features and capabilities for Microsoft Teams, including the rollout of unified presence and a new modern admin portal.
- Annotate photos using the new inking tool in Office Lens on Android and iOS.
- Microsoft Forms, a simple app for creating surveys, quizzes, and polls, is now generally available to all Office 365 commercial customers.
- Word, Excel, and PowerPoint users on Mac can now chat with other people in a document without leaving the app.
Availability
Microsoft 365 is a complete, intelligent solution that includes Office 365 apps and services with Enterprise Mobility + Security and Windows 10 Pro. Explore Microsoft 365 products: Office 365 | Windows 10 | Enterprise Mobility + Security. Learn more about what’s new for Office 365subscribers this month at: Office on Windows desktops | Office for Mac | Office Mobile for Windows| Office for iPhone and iPad | Office on Android. Commercial customers on both Monthly Channel and Semi-Annual Channel can also get early access to a fully supported build through Targeted Release (Clients, Services). This site explains more about when you can expect to receive the features announced today.
- Ink analysis in PowerPoint—Rolling out to Office 365 and Microsoft 365 customers enrolled in Office Insiders over the next month.
- New ink gestures in Word—Rolling out to Office 365 and Microsoft 365 customers enrolled in Office Insiders over the next month.
- AI enhancements in Word for Mac—Rolling out to Office 365 and Microsoft 365 customers enrolled in Office Insiders over the next month.
- Mobile editing for Office 365 Business Essentials, F1 and E1—All the Office mobile apps can be downloaded from iOS App Store or Google Play. All functionality is available now for Outlook for iOS and Android. Editing will be available in Word, PowerPoint, Excel, and OneNote apps for iOS and Android over the next few months.
- Office 2019 Preview—View availability
- New capabilities in Outlook for iOS—View availability
- Calendar enhancements in Outlook for Windows—View availability
- Advanced security features in Microsoft 365 Business—View availability
- Enhancing Enterprise Security—View availability
- Capabilities to simplify IT management—View availability
- Centralized Deployment of Outlook add-ins—View availability
- Tools for Organizational Compliance—View availability
- Multi-Geo Capabilities—View availability
Please note that the content contained within these blog posts describes features and functionality that may vary by market. For full details on Office Product offerings for your market, please visit https://products.office.com
Content linked from within these posts may not be available in your local language.
How To Add Bullets and Number lists In a Word Document
Bullets and numbering
Word gives you a chance to make two kinds of records: bulleted and numbered. Bulleted and numbered records help to streamline steps or things to the peruser. Educators regularly utilize bulleted records to feature essential bits of their lessons. Manuals regularly incorporate numbered records to help perusers in well ordered guideline.
A slug is typically a dark circle, however it can be some other image used to feature things in a rundown. Utilize slugs to list things that don't need to be in a specific request.
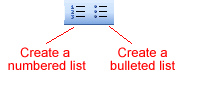
Numbers (or letters) are utilized when data must be in a specific request. You can utilize the default Bullets and Numbering settings by tapping on the fitting catch on the Formatting toolbar.
Make bulleted and numbered records
To make a bulleted list:
- Tap the Bullets Button Bullets catch on the Formatting toolbar.
- Sort the principal thing on your rundown, and press Enter.
- The following line will start naturally with another projectile.
- Sort the following thing on your rundown, and press Enter.
- At the point when your rundown is finished, press the Enter key twice to stop the bulleted list.
To make a numbered list:
- Tap the Numbers Button Numbering catch on the Formatting toolbar.
- Sort the main thing on your rundown, and press Enter.
- The following line will start naturally with the following number.
- Sort the following thing on your rundown, and press Enter.
- At the point when your rundown is finished, press the Enter key twice to stop the numbered list.
- Audit the accompanying tips to enable you to deal with your numbered or bulleted records.
- Expel a shot by putting the addition point to one side of the slug or number and press delete (you won't have the capacity to put your inclusion point to one side of the projectile).
- On the off chance that you need to change a bulleted rundown to a numbered rundown (or the other way around), select the whole rundown and tap the proper catch.
- To make a line break between things in a bulleted or numbered list, put your cursor where you need the line break and press Shift + Enter.
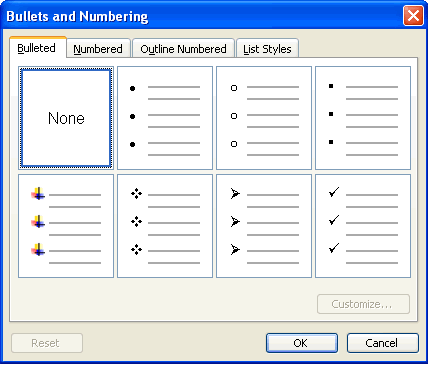
The Bullets and Numbering discourse box
Word offers you numerous different choices for your shots and numbers, other than the default that you have seen up until this point.You can see the sort of shots and numbers accessible to you by opening the Bullets and Numbering discourse box.
- Select the content you need to transform into a rundown.
- Snap Format on the menu bar.
- Select Bullets and Numbering. The Bullets and Numbering exchange box shows up.
- Tap the Bulleted tab to see all slug choices, and tap the Numbered Tab to see every single number alternative.
- Select which sort of projectiles or numbers you need, at that point click OK.
The Bullets and Numbering discourse box additionally offers you Outline Numbered choices. When you tap the Outline Numbered tab, you can see layouts for making a blueprint. The List Styles tab enables you to make your own particular rundown style utilizing comparative arrangement, slugs, and characters.
Blogs : www.office.com /setup
How To Deal With Lists In Microsoft Word 2007
Introduction
Working with Lists bulleted and numbered records can be utilized as a part of your reports to orchestrate and design content to draw accentuation. In this exercise, you will figure out how to alter existing slugs, embed new bulleted and numbered records, and select images as projectiles.

Utilizing bulleted and numbered records
To insert a new list:
- Select the content you need to arrange as a rundown.
- Tap the Bullets or Numbering orders on the Home tab.
- Left-tap the shot or numbering style you need to utilize. It will show up in the record.
- Position your cursor toward the finish of a rundown thing, and press the Enter key to add a thing to the rundown.
- To expel numbers or shots from a rundown, select the rundown and tap the Bullets or Numbering charges.
To choose a substitute projectile or numbering style:
- Select the majority of the content in a current rundown.
- Tap the Bullets or Numbering summons on the Home tab.
- Left-snap to choose a substitute projectile or numbering style.
Utilizing bulleted records
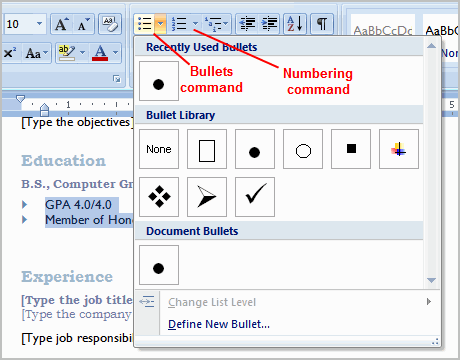
To utilize an image as a slug:
- Select a current rundown.
- Tap the Bullets charge.
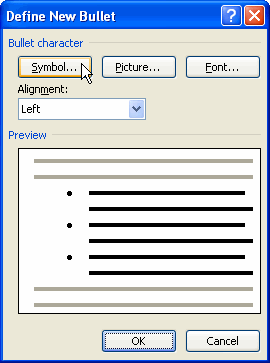
- Select Define New Bullet from the rundown. The Define New Bullet exchange box shows up.
- Tap the Symbol catch. The Symbol exchange box shows up.
- Tap the Font: drop-down box, and select a textual style class.

- Select Font Drop-down
- Left-click an image to choose it.
- Snap OK. The image will now show up in the Preview segment of the Define New Bullet exchange box.
- Snap OK to apply the image to the rundown in the archive.
- You can utilize a photo as a shot. Tap the Picture catch in the Define New Bullet discourse box, at that point find the picture record on your PC.
To change the projectile shading:
- Select a current rundown.
- Tap the Bullets summon.
- Select Define New Bullet from the rundown. The Define New Bullet discourse box shows up.
- Tap the Font catch. The Font discourse box shows up.

- Tap the Font shading: drop-down box.
- Left-click a shading to choose it.
- Snap OK. The projectile shading will now show up in the Preview area of the Define New Bullet discourse box.
- Snap OK to apply the slug shading to the rundown in the archive.
Blogs : www.office.com/setup
Microsoft debuts Office 2019 as a Preview for business customers

In addition to revealing the Windows 10 April 2018 release date, Microsoft also announced this morning that Office 2019 Preview is now available for business customers. This first preview release includes Word, Excel, PowerPoint, Outlook, Publisher, Access, Project, Visio and OneNote, and all these apps will only run on Windows 10.
Introducing the Office 2019 Preview for commercial customers. Learn more about the new features (already available in @Office365) and how organizations can install the preview: http://msft.social/xkaDn4 https://cards.twitter.com/cards/18ce54m3aa8/5n9ee …
Office 2019
support.microsoft.com

Microsoft has found a new favorable audience with millennials

It has been a while since Microsoft and young consumers have met on favorable grounds, well directly at least. Sure, Microsoft has kept a rather substantial foot in education with software and services such as OneNote, Office, and Microsoft Enrollment for Education, but these projects are usually seemingly hoisted upon unsuspecting students.
For the last decade and a half, most young consumers have sought out products and services from Microsoft’s competitors such as Apple and Google while only harboring mild disdain for Microsoft solutions, but it looks like the company may be garnering enough cool cache to turn the heads of millennials. According to YouGov, that Microsoft has, over the years, been able to muster a more positive impression of itself with consumers.Microsoft’s Impression score — which asks consumers if they have an overall positive or negative impression of a particular brand — has reached its highest point in the last two years, according to new data from YouGov BrandIndex. In the past few weeks alone, after Nadella announced major plans to reorganize the company and amid the latest Windows update, Microsoft’s Impression score has climbed from 36 to 40.
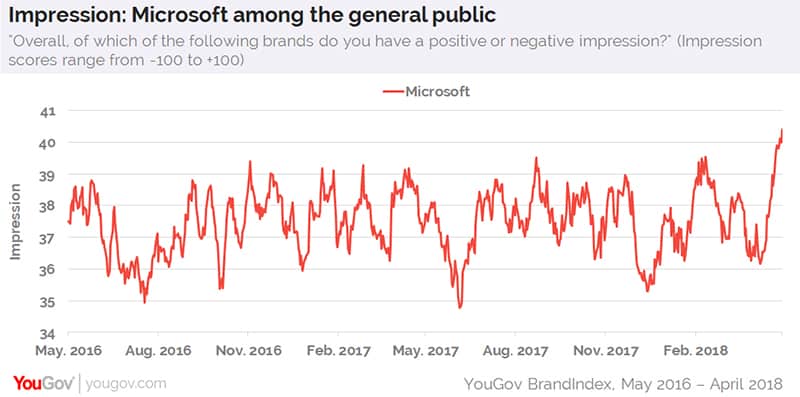 Despite the seasonality of the results, the overall trend looks to be in Microsoft’s favor as the age range of impressed consumers hovers around 18-34 with a fondness for the company charted at 44 while consumers 35+ gave the brand a score of 39.
Other notable trends include the age group of 18-34 were surveyed as more likely to use cloud-based storage and solutions versus their 35+ counterparts who had less confidence in the technology. With millennials more likely to use cloud-based solutions, Microsoft has the opportunity to further endear themselves to a group of consumers with a maturing purchase power.
The 18-34 age group also held positive impressions of artificial intelligence as a viable evolutionary computing solution. Fortunately, for Microsoft, both cloud and AI are areas where the company is investing heavily in and already beginning to see budding gains.
All of this is to say, alongside with the company’s recent resurgence, Microsoft has seemingly been given a second opportunity to reimagine itself devoid of the relatively poor impressions its former cornerstone business, Windows, left in the minds of core buying audience. Perhaps, this was all part of Microsoft CEO Satya Nadella’s plan to focus on AI and the cloud at the seeming expense of ‘aging’ Windows consumers.
Despite the seasonality of the results, the overall trend looks to be in Microsoft’s favor as the age range of impressed consumers hovers around 18-34 with a fondness for the company charted at 44 while consumers 35+ gave the brand a score of 39.
Other notable trends include the age group of 18-34 were surveyed as more likely to use cloud-based storage and solutions versus their 35+ counterparts who had less confidence in the technology. With millennials more likely to use cloud-based solutions, Microsoft has the opportunity to further endear themselves to a group of consumers with a maturing purchase power.
The 18-34 age group also held positive impressions of artificial intelligence as a viable evolutionary computing solution. Fortunately, for Microsoft, both cloud and AI are areas where the company is investing heavily in and already beginning to see budding gains.
All of this is to say, alongside with the company’s recent resurgence, Microsoft has seemingly been given a second opportunity to reimagine itself devoid of the relatively poor impressions its former cornerstone business, Windows, left in the minds of core buying audience. Perhaps, this was all part of Microsoft CEO Satya Nadella’s plan to focus on AI and the cloud at the seeming expense of ‘aging’ Windows consumers.