How To Add Headers, Footers, and Page Numbers In Microsoft Word 2013
Introduction
The header is an area of the record that shows up in the best edge, while the footer is a segment of the report that shows up in the base edge. Headers and footers for the most part contain extra data, for example, page numbers, dates, a writer's name, and references, which can help keep longer records sorted out and make them simpler to peruse. Content entered in the header or footer will show up on each page of the report.
To make a header or footer:
In our case, we need to show the creator's name at the highest point of each page, so we'll put it in the header.
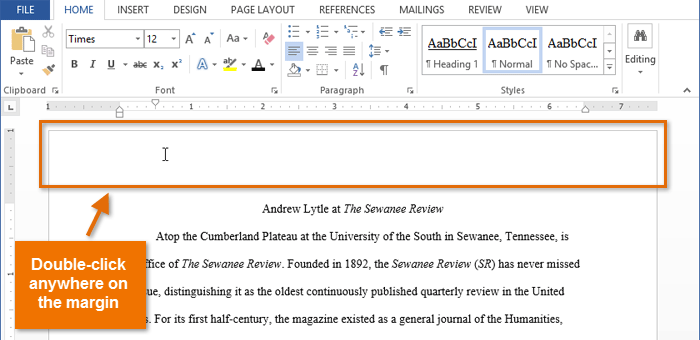
1. Double tap anyplace on the best or base edge of your report. In our illustration, we'll double tap the best edge.
2. The header or footer will open, and a Design tab will show up on the correct side of the Ribbon. The inclusion point will show up in the header or footer.

3. Sort the coveted data into the header or footer. In our illustration, we'll write the writer's name.

4. When you're done, click Close Header and Footer. Then again, you can press the Esc key.

5. The header or footer content will show up.

To embed a preset header or footer:
Word has an assortment of preset headers and footers you can use to upgrade your archive's outline and format. In our case, we'll add a preset header to our record.
- Select the Insert tab, at that point tap the Header or Footer order.

- In the menu that shows up, select the coveted preset header or footer.

- The header or footer will show up. Preset headers and footers contain placeholders for data, for example, the title or date; they are known as Content Control fields.

- To alter a Content Control field, click it and sort the coveted data.

- When you're done, click Close Header and Footer. On the other hand, you can press the Esc key.
- On the off chance that you need to erase a Content Control field, right-click it and select Remove Content Control from the menu that shows up.
Altering headers and footers
After you close the header or footer, it will even now be obvious, however it will be bolted. Essentially double tap a header or footer to open it, which will enable you to alter it.

Design tab options
At the point when your archive's header and footer are opened, the Design tab will show up on the correct side of the Ribbon, giving you different altering alternatives:
- Conceal the main page header and footer: For a few archives, you may not need the primary page to demonstrate the header and footer, as on the off chance that you have a cover page and need to begin the page numbering on the second page. On the off chance that you need to shroud the principal page header and footer, check the container beside Different First Page.

- Expel the header: If you need to evacuate all data contained in the header, tap the Header order and select Remove Header from the menu that shows up.

- Expel the footer: If you need to evacuate all data contained in the footer, tap the Footer order and select Remove Footer from the menu that shows up.

- Extra choices: With the Page Number summon and the orders accessible in the Insert gathering, you can include page numbers, the date and time, pictures, and more to your header or footer.

To insert the date or time into a header or footer:
Now and then it's useful to incorporate the date or time in the header or footer. For instance, you may need your record to demonstrate the date when it was made.
Then again, you might need to demonstrate the date when it was printed, which you can do by setting it to refresh consequently. This is valuable on the off chance that you as often as possible refresh and print an archive since you'll generally have the capacity to tell which form is the latest.
1. Double tap anyplace on the header or footer to open it. Place the inclusion point where you need the date or time to show up. In our case, we'll put the addition point on hold beneath the creator's name.

2. The Design tab will show up. Tap the Date and Time order.

3. The Date and Time exchange box will show up. Select the coveted date or time organize.
4. Check the case beside Update Automatically on the off chance that you need the date to change each time you open the record. On the off chance that you don't need the date to change, leave this choice unchecked.
5. Snap OK.

6. The date will show up in the header.

Including page numbers
Word can naturally mark each page with a page number and place it in a header, footer, or side edge. When you have to number a few pages in an unexpected way, Word enables you to restart page numbering.
To add page numbers to a record:
In our case, we'll add page numbering to our report's footer.
- Double tap anyplace on the header or footer to open it. In the event that you don't as of now have a header or footer, you can double tap close to the best or base of the page. The Design tab will show up on the correct side of the Ribbon.

- Tap the Page Number charge. In the menu that shows up, float the mouse over Current Position and select the coveted page numbering style.

- Page numbering will show up.

- To alter the text style, text dimension, and arrangement of page numbers, select a page number and tap the Home tab. Word's content arranging alternatives will show up.

- When you're done, press the Esc key. The page numbering will be organized.

- On the other hand, you can add page numbers to the header or footer by tapping the Page Number charge and after that choosing Top of Page or Bottom of Page. In the event that you have a current header or footer, it will be expelled and supplanted with the page number.

Blogs : www.office.com /setup